< Previous | Contents | Manuals Home | Boris FX | Next >
Although SynthEyes is perfectly capable of tracking shots with no artificial tracking marks, you may need to track blue- or green-screen shots, where the monochromatic background must be replaced with a virtual set. The plain background is often so clean that it has no trackable features at all. To prevent that, green-screen shots requiring 3-D tracking must be shot with tracking marks added onto the screen.
Often, such marks take the form of an X or + made of electrical or gaffing tape. However, a dot or small square is actually more useful to SynthEyes over a wide range of angles. With a little searching, you can often locate tape that is a somewhat different hue or brightness as the background — just enough different to be trackable, but sufficiently similar that it does not interfere with keying the background.
You can tell SynthEyes to look for trackers only within the green- or blue-screen region (or any other color, for that matter). By doing this, you will avoid having to tell SynthEyes specifically how to avoid tracking the actors.
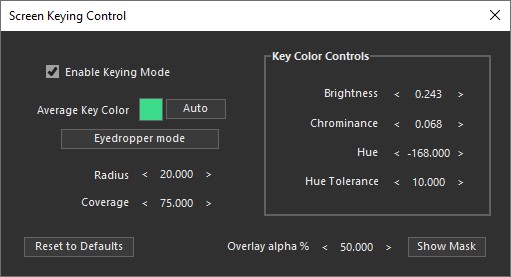
You can launch the green-screen control dialog from the Summary control panel using the Green Screen button, or with the Window/Screen Keying Control menu item.
When this dialog is active, the main camera view will show all keyed (trackable) green- screen areas, with the selected areas overlaid with a pink checkerboard, making them easy to see. [You can also see this view from the Feature panel’s Advanced Feature Control dialog by selecting B/G Screen as the Camera View Type.]
NOTE: This is now a modeless dialog, so you can use the rest of the SynthEyes interface while it is open. In earlier SynthEyes versions, this dialog was modal and the rest of the user interface was locked while it was open.
Tip: You can use the dialog to adjust the Overlay alpha% spinner up or down, or even select a binary black and white view of the matte with Show Mask.
Upon opening this dialog, SynthEyes will analyze the current image to detect the most-common hue. You may want to scrub through the shot for a frame with a lot of color before opening the dialog. Or, scrub to a different frame, then hit the Auto button (next to the Average Key Color swatch) as needed.
Tip: you can also click on Eyedropper mode, then click on the desired area in the camera view. Note that, like with setting the swatch directly, color keying looks for pixels matching the brightness/chrominance/hue specifications, not for particular RGB values. Further adjustment is likely.
After the Hue is set, you may need to adjust the Brightness and Chrominance so that the entire keyed region is covered. Scrub through the shot a little to verify the settings will be satisfactory for the entire shot, using the overlay and/or mask.
The radius and coverage values should usually be satisfactory. The radius reflects the minimum distance from a feature to the edge of the green-screen (or actor), in pixels. The coverage is the amount of the area within the radius that must match the keyed color. If you are trying to match solid non-key disks that go as close as possible to an actor, you might want to reduce the radius and coverage, for example.
You should use the Low Detail motion hint setting at the top of the Summary panel to when tracking green-screen shots (it normally reads Normal). SynthEyes’s normal analysis looks for the motion of details in the imagery, but if the most of the image is a featureless screen, that process can break down. With Low Detail selected, SynthEyes uses an alternate approach. SynthEyes will configure the motion setting automatically the first time you open the greenscreen panel, as it turns on the green- screen enable. See also a technique for altering the auto-tracker parameters to help green-screen shots.
The green-screen settings will be applied when the auto-track runs. Note that it is undesirable to have all of the trackers on a distant flat back wall. You need to have some trackers out in front to develop perspective. You might achieve this with tracking marks on the floor or (stationary) props, or by rigidly hanging trackable items from the ceiling or light stands. In these cases, you will want to use supervised tracking for these additional non-keyed trackers.
Since the trackers default to a green color, if you are handling actual green- screen shots (rather than blue), you will probably want to change the tracker default color, or change the color of the trackers manually. See Keeping Track of the Trackers for more information.
After green-screen tracking, you will often have several individual trackers for a given tracking mark, due to frequent occlusions by the actors. As well as being inconvenient, it does not give SynthEyes as much information as it would if they were combined. You can use the Coalesce Nearby Trackers or Coalesce Closest in 3-D dialogs to join the trackers together; be sure to see the Overall Strategy subsection.
You can work in the perspective view with a matted version of the green screen shot, ie with the keyed portions of the shot transparent and leaving only the un-keyed actors and set visible in the 3-D perspective view. You can use this to place the actors at their appropriate location in the 3-D world as an aid to creating your composite.
This will happen automatically if the dynamic projection screen is active in the perspective view (on by default; see the Perspective Projection Screen Adjust script). The dynamic projection screen holds the imagery within the perspective view, and is not selectable or visible in other viewports.
For "real" geometry that is visible in other viewports (notably, other perspective view), the Projection Screen Creator script creates mesh geometry in the scene that is textured with the current shot imagery. As with the builtin screen, you can tell the creator to Matte out the screen color.
Note : whether you use the dynamic projection screen or the creator script, you can use an alpha channel on your shot instead of SynthEyes's keyer. When doing this, be sure to turn on Keep Alpha when opening the shot
With a suitable tracker, use the Camera to Tracker Distance script to determine the distance to the screen: use the value in parentheses, ie along the camera axis
You can write the green-screen key as an alpha-channel or RGB image using the image preprocessor ’s Save Sequence (available on the Shot menu). Any roto-splines will be factored in as well. With a little setup, you can use the roto-splines as garbage mattes, and use small roto dots to repair the output matte to cover up tracking marks, as the rotospline mask (see RotoMask button on the Camera View’s View toolbar) is combined with the screen-keying tool’s mask. You can preview that output by turning on both RotoMask and Alpha buttons in the Camera View.
Note: this keyer is intended for determining where to track and thus produces binary yes or no output; it does not produce gray-scale data with smooth edges (or for hair) for compositing. The truly determined might write masks at 4x resolution then filter down in an external app (or even SynthEyes).
©2024 Boris FX, Inc. — UNOFFICIAL — Converted from original PDF.