< Previous | Contents | Manuals Home | Boris FX | Next >
MOVED! There's now much more information and new tools in the Camera Calibration Manual, found from the Help Menu in SynthEyes. The existing material is still a good overview and usable, so it is retained here for reference.
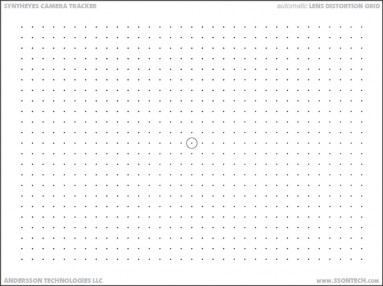
If you are able to shoot a specific lens calibration grid immediately before or after principal photography, SynthEyes offers a tool to generate accurate lens presets automatically.
We have a special 36"x27" lens calibration grid that will make this easy.
Here's the process in detail.
1. Print out the 36"x27" automatic lens distortion grid from our website. Be sure to use matte paper. Do not attempt to use a letter-size version: the camera will have to be too close or zoomed in, either of which will change the distortion. Mount on a flat surface—you should take significant care that it is smoothed flat and pulled tight, or laminate it to a piece of foam- core or equivalent.
2. Shoot a short shot of the lens distortion grid during principal photography—some 3-5 seconds with the camera aimed at the center of the grid, but intentionally circling around the center, so that camera aim goes over to the next dot in the grid pattern instead. The camera should be close enough that the shot is "all grid" with grid extending all the way to the edge of the frame and beyond, with none of the text or boundary visible. The movement should be slow, to avoid motion blur and rolling shutter distortion. Important: your calibration will apply only for that particular zoom setting on the lens. You should calibrate for each setting you use. The center reference circle is for your reference during shooting only and does not have any significance during later processing.
3. In SynthEyes, click Shot/Create Lens Grid Trackers to create an array of supervised symmetric trackers, one for each dot. Verify the created trackers, deleting any non-grid trackers, and creating any missing ones in the interior area of the grid. (It is possible to do this manually also. If the grid pattern is not sufficiently regular, you can assign grid coordinates manually by giving every tracker specific names that give the grid coordinates x,y ie 3,5 2,6, etc.)
4. Track them through the entire shot. You may need to increase the search area, depending on the amount of motion, though if you do, the motion is probably too rapid. Be sure to watch the trackers in the four corners, which
are the ones most prone to problems, especially with fisheye lenses. You can edit trackers to turn them back on if they have gone off-screen, then reappeared, but generally that should not be necessary. If there are some frames that are motion-blurred too much, click Skip Frame on the Features panel for each, to cause those frames to be ignored.
5. After tracking, control/command-A and then Lock all the trackers.
6. Rewind to the beginning of the shot, or whichever frame has the most trackers visible.
7. Click Shot/Process Lens Grid to start the analysis of the data from the trackers.
8. Answer a question about whether you want the one-pass or two-pass workflow. The one-pass flow produces compact normal-looking images that can be delivered as-is; the more complex two-pass flow lets you ultimately composite with and deliver the original distorted imagery.
9. Answer a question about whether you want a full high-order analysis (which will create a lens preset), or a simpler analysis using only the quadratic and cubic terms on the image preprocessor's lens distortion panel. If the lens has little distortion, start with the simpler analysis.
10. Answer a question about whether or not you want to calculate the lens's optic center. You should answer YES most of the time, answering NO only when there is very little distortion, or the lens has primarily pin-cushion distortion (which the centering calculation is not designed for).
11. If you want high-order analysis, it will be stored in a lens preset. You will need to give SynthEyes a lens preset name and file name in which to store it—the file must be in your script storage area, typically within the LensGrid folder (not in the application's script area, which users do not have access to in modern operating systems).
12. Processing may take some substantial time for the full analysis, especially if there are many frames and you do not have a desktop machine with a substantial number of cores. (Note: if the solving process encounters problems, it will take even longer. You can cancel it, though it will also take some time to reach a cancellable point.)
13. When complete, SynthEyes will display an RMS error number indicating the error level obtained, and the computed optic center position. The error will likely be over 1 pixel for wide angle lenses, under 1 pixel for normal lenses.
For a small amount of distortion, and a one-pass workflow, the simple analysis will often be fine. For more complex distortion (wider angles lenses) or if you need to do the two- pass workflow, you will probably want the full high-order analysis.
If the lens is very wide angle, the two-pass undistorted image may have very long tails in the corner, if the corners of the sensor reach or exceed the vanishing circle of the lens (where the image is entirely black outside that circle).

This is a consequence of trying to image a sphere with a flat image plane. You may have to switch to the one-pass approach instead.
After the lens distortion analysis is complete, you should save the SNI file—it contains the results, which include not only the lens settings (on the image preprocessor's lens tab), the newly-created lens preset (if requested), but also cropping values on the Cropping tab, a zoom value on the Adjust tab, and new resolution values on the Output tab.
The easiest way to use your newly-created lens calibration SNI file is to do a Shot/Change Shot Images to the actual shot you need to undistort, then use Output/Save Sequence to write the undistorted sequence to disk. You can then do a File/New, open the newly-created undistorted sequence, and track away.
If you need to, you can look inside the LNI file to see a set of the extracted parameters again, including the Cropping and scale settings, as well as the RMS error value.
©2024 Boris FX, Inc. — UNOFFICIAL — Converted from original PDF.