< Previous | Contents | Manuals Home | Boris FX | Next >
An Initial Example of GeoH Tracking
We'll run through an initial example here, to give you some idea of how a GeoH track can go. Be sure to check our youtube channel for the tutorial version and related tutorials too.
Note: there's an even simpler Quick Start: Geometric Hierarchy Tracking section in the main SynthEyes User Manual.
This "oats" shot is available for download from the web site in HD and 4K (QHD) versions.
- Open the HD or 4K version of the shot. (Reference: "Opening the Shot" in the SynthEyes User Manual.)
- If you have an accurate lens field of view estimate, this is the time to enter it. We recommend trying this example without it, then with as follows. On the first frame, go to the Lens room on the top iconbar, and enter the lens field of view value—50 degrees in this case. If you do this, leave the "FOV is fixed" setting alone below.
- Go to frame 66, which shows the top of the cylinder, maximizing available perspective information.
- Click to the GeoHTrack room on the top iconbar (click the word, not the icon—the word changes the panel and view, whereas clicking the icon changes only the panel).
- Click Lock on the mouse toolbar so that the image is visible.
- Right-click, then select Creation Object/Cylinder.
- Drag on the ground plane to start creating with similar diameter (no need to be exact).
- Drag a second time to set height.
- Hit backslash to go to a wireframe view, if it isn't already.
- Control-drag the red arrow right to tilt the top slightly forward, giving a better view of the top of the cylinder.
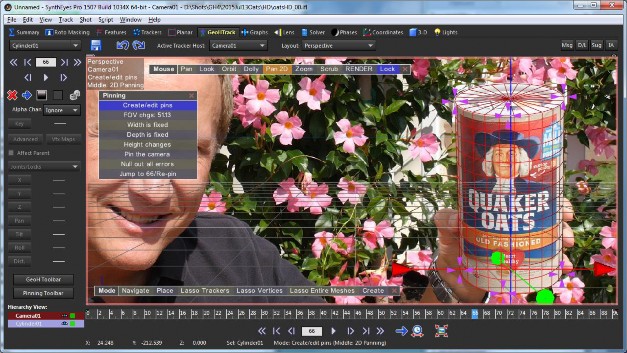
- Click the Pinning Toolbar button at bottom of the GeoH panel.
- With the cylinder still selected, click Create/edit pins, FOV is fixed, and Height is fixed (changing the latter two to FOV changes and Height changes).
- Begin dragging locations on the wireframe to their matching spot on the image. We recommend starting on the top left and top right of the cylinder, then along the bottom edge, as seen below.
- Right-drag in the viewport to zoom in and out, or middle-pan. Right-click "Pan 2D" on the mouse toolbar to reset the zoom.
- Continue adding pins and adjusting them iteratively as needed until the outline matches the imagery well. Note that the white top cap is slightly larger in diameter than the can itself, make the can match, not the larger top.
- If many pins eventually do not match up as proper crosshairs, click "Null out all errors" on the Pinning toolbar, then continue adjusting.
- Here we show six pins aligning the cylinder.
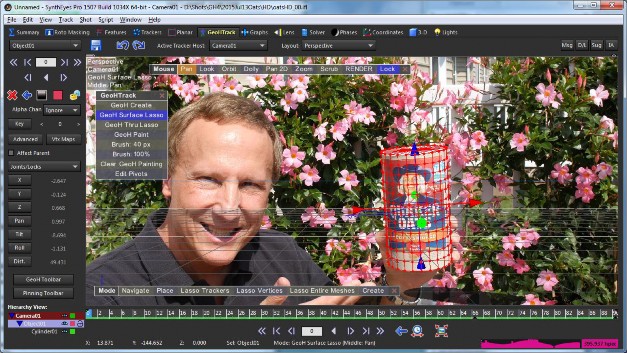
- Click the GeoH Toolbar button; close the Pinning toolbar.
- Click the GeoH Surface Lasso tool.
- Shift-click the cylinder to create the primary GeoH object (the node that will be animated).
- Click the X, Y, Z, Pan, Tilt, and Roll buttons to unlock all 6 axes.
- Click Play to track through 2nd half of shot.
- Click Backwards to Key at the top of the GeoH panel or on the main play bar, to return to the original key frame.
- Change the tracking direction arrow on the GeoHTrack panel ( not the one on the main playbar!). The main playbar's direction will be changed automatically.
- Click Play to track the shot in the backwards direction.
- Change the Layout to Quad Perspective. Use the middle mouse scroll wheel or right-drag in the views to zoom, middle-drag to pan. Adjust the views to see the 3D object path.
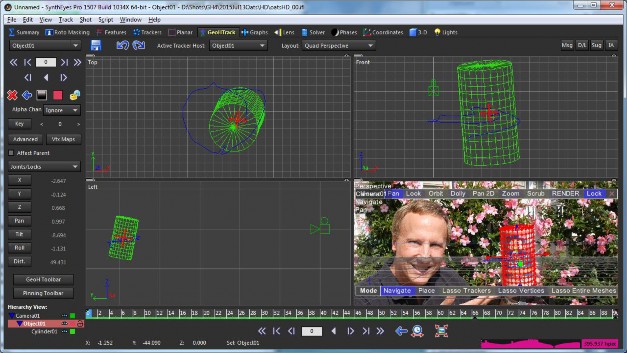
- Scrub by dragging in the time bar (or mouse scroll in the perspective window or time bar). You may see some glitches in the path...
- You can work on the path a number of ways, see the later section on Path Cleanup. Here a few additional key frames have been added and a glitch or two removed.
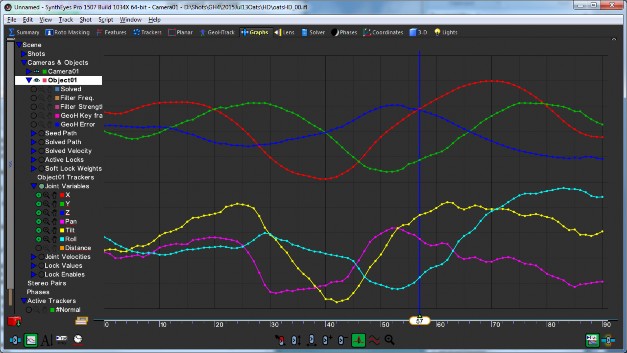
- Click to the Graphs room.
- Expose the Camera & Objects node, Object01, then the Joint Variables.
- Turn off the green circle visibility toggles for the 5 channels immediately under Object01, and for Distance. Here the channel zooms and offsets have been adjusted a little and the background coloration turned off (at lower right) for clarity.
- Click the lock button on the GeoHTrack panel.
- You can export to your compositing or animation package, see Exporting to Your Animation Package in the SynthEyes User Manual.
Exactly what happens during tracking will be determined by your initial placement, so no two tracks will be exactly the same. In the event that the GeoH tracker flies away, or just to experiment, Edit/Undo then go back to the key frame. Then try one or more of the following:
- Turn on the Fine checkbox (useful for smaller objects)
- Turn on the Careful checkbox (useful for more rapid motions)
- Set the channel selector to RGB (useful when there is color contrast with little luminance contrast)
- With the GeoH Surface Lasso mode active, lasso the vertex at the center of the top of the cylinder, so that the top of the cylinder isn't tracked at all. (The model should really reflect that the true top is beneath the top end of the cylinder.)
- Set the spinner next to Key to 12, say, and run through tracking to see the effect of setting additional keys automatically.
You can also do the following to address glitchy frames, or frames where the track starts to fly away or become less stable:
- Go to the frame before the problematic frame.
- Click the Key button on the GeoH panel.
- Continue tracking.
- Repeat as needed.
This updates the pattern being tracked on a frame where the tracking is still successful, allowing the tracker to adapt to ongoing changes in the imagery.
©2023 Boris FX, Inc. — UNOFFICIAL — Converted from original PDF.