|
Exciting news! SynthEyes has joined Boris FX and its award-winning VFX product family. Find out what this means for you. |
San Francisco Practice Shot
This is a practice exercise of supervised tracking and object-mode tracking. It uses a very old piece of film, a trip down Market Street of 1905 San Francisco (public domain footage supplied by archive.org). Though the original is about 20 minutes, we'll use a clean 42 frame section. You should already be able to do flybys.avi with supervised tracking. [Note: the discussion below assumes Z-up coordinates, but it can be done in any coordinate system with a small mental adjustment to the coordinate system axes.]
The sanfran ZIP file contains the JPEG image sequence and a solved .SNI file. You can unpack them into their own folder. If you want to compare to the pre-solved .sni file, when you open it, you should do a Shot/Change Shot Images to reconfigure for the new image sequence location.
The first step is to track the main background. There are many moving people and vehicles; combined with the low overall image quality, supervised tracking is a must. Since the source is black and white, you could use the image preprocessor to store only luminance data, though it is hardly necessary for this small of a shot.
In a short shot like this, it is important to develop some perspective from comparatively nearby objects. The various holes in the pavement provide many trackable features. You should use the Tracker Curves view to refine your tracking. One trick is to use the Tracker and Camera view to adjust a tracker to the correct position that eliminates a spike on a particular frame.
The example solved version uses some marks on the pavement to define a ground plane, plus the alignment of some lights along the left to define a Y axis. One light is the target of the second, which is in "|| Y Axis" mode. The light not only set the heading of the world, but the slant of the ground plane from front to back as well. If the lights aren't at the same height or aren't well tracked, this approach may cause some trouble. The distance between some foreground features sets the overall sizing. You can use the constrained points view (with Camera01 active) to examine the setup from the solved file.
The second major step is to track the automobile approaching from the right (traffic law enforcement doesn't seem to have come into style quite yet). There are many trackable features on the automobile, though many are reflective features that may not be stable 3-D positions, resulting in some distortion.
If you complete tracking and solve the scene before setting up a coordinate system for the automobile, you'll notice the object's null is far from the trackers on the automobile. So to begin with, you can set up a coordinate system for the automobile using trackers on the bumper as the origin and X axis, and on the two wheels at left of the image to be at the same height in the object coordinate system. Set up one axle as the target of the second, with the second set to "Same XY Plane."
The interesting part comes when you compare the path of the automobile to the other features in the background scene. The automobile could really be giant, located far away, or tiny, located on a glass plate up close. This is the territory of the optical illusions used in features such as "Honey, I Shrunk the Kids." Since we're going to assume that this shot did not involve any trickery, we want the scales to be comparable between the object and background. If we had some measurements from the automobile and features on the ground, that would be straightforward: we could set up distance constraints on each. In this case, we can guess and get fairly close.
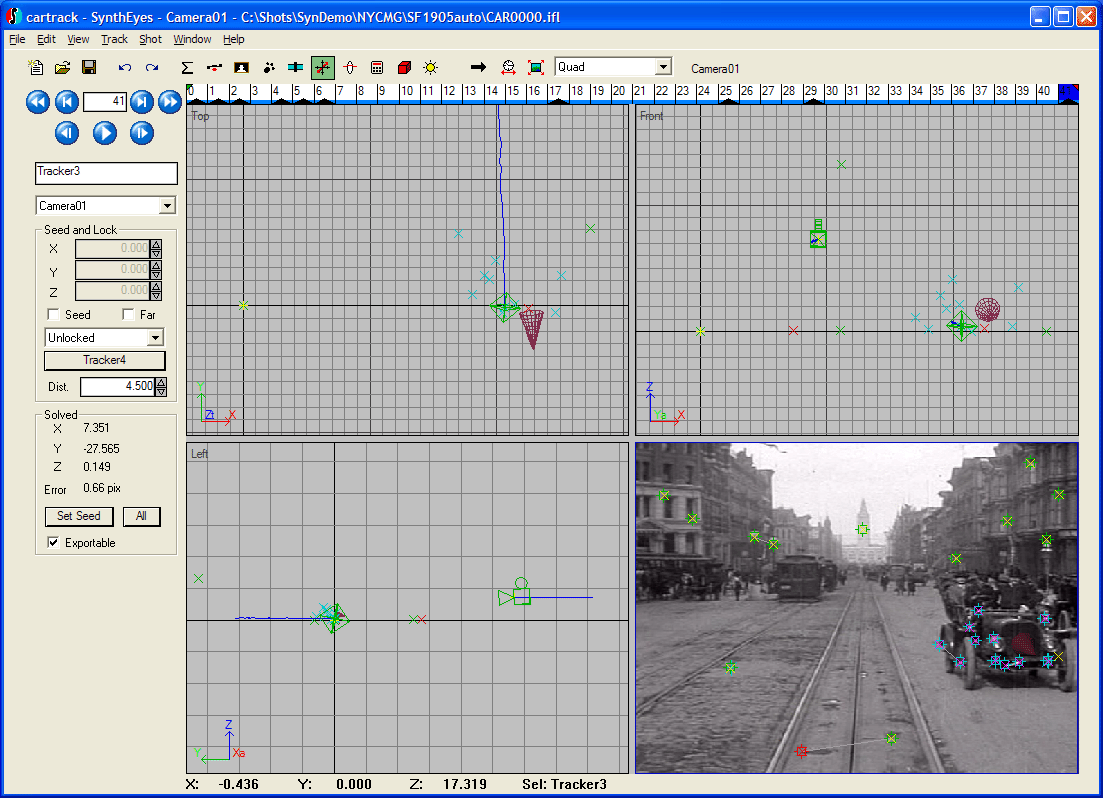
However, we can do even better by comparing the position of the automobile to objects on the ground. In the screen capture below, you can see how this was done. You can click image to see it full size.
In the Camera view, you can see that, on the final frame of the movie, the automobile is just passing the tracker to the left of the tracks, which is the origin tracker for the camera. At the bottom are the two trackers used to set the distance scale for the camera.
In the Top view, you can see the origin tracker at left center, and the automobile trackers and nose cone at right. This is after the camera sizing has been set. As you alter the camera distance scale (the distance spinner of 4.5 in the Coordinate system panel), and re-solve, you'll see that the automobile moves forwards and backwards relative the origin (of course its overall size and motion is changing also). But by adjusting the relative sizes until the correct geometric relationship is obtained on this final frame, we will get the correct overall size and positioning of the automobile in the scene.
This is the kind of insight that will let you adjust relative sizing in complex situations.
SynthEyes easily is the best camera match mover and object tracker out there.
Matthew Merkovich
